Overview
Screener Display
The Chaikin Analytics Screener is a powerful tool for finding stocks and ETF's which meet criteria you specify. The first step is to select whether you wish to screen stocks or ETF's. Once you make tha selection, you can select a starting Universe, apply Global Filter criteria, and combine Power Gauge, Performance, Technical, and Fundamental criteria, as well as Chaikin Buy/Sell Signals. The Screener is designed to allow you to try ideas in rapid succession, to see the effect on results.
Matching results are displayed in the Results window and can be saved as a User List, and viewed immediately in the Workspace.
Data Availability
Data is indexed for Screening once a day prior to market open on trading days, and on Saturday evenings. The data used in screening is the most current data available as of the time of indexing, which is shown at the bottom of the Rules Window.
Only active stocks in the Chaikin Analytics system are included for screening. This may include stocks with no Power Gauge Rating. ETFs are not included in screens.
Rules Window
In the Rules Window, select a starting Stock Universe and specify Screening Criteria to generate a list of matching Results.
Default State
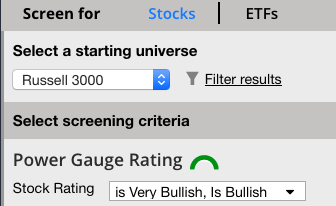
Initially, the Screener will be set to a starting Universe of Russell 3000 and a Power Gauge Rating of Very Bullish and Bullish, with all other criteria empty (showing “- – -“).

The button to run a screen will say Get Results indicating a screen has yet to be run.

Adding Screening Criteria
Use the menu drop-downs to select values for criteria, or set them to empty.
Performing a Screen
When you are ready, press Get Results to generate a list of stocks in the Stock Universe matching the criteria you have specified. Stocks must meet all specified criteria to be included; empty criteria do not affect the screen. Results will display in the Results window to the right.
Once the Screen has been performed, the SCREEN button will switch GREY and the dialogue will change to Update Results.
Changing Criteria
Once Results are displayed, you can change criteria without losing your current Results display. When the first setting is changed, the 'Update Results' button will turn GREEN again, indicating that you can press it to generate new Results.

Resetting the Screener
You can reset the Screener to its default state at any time by pressing “Reset Icon“. This will erase any results currently displayed and reset the screener to its default state.

Matching Results
When a Screen is run, you will see ‘lozenges’ next to each of the criteria you have set, indicating the successive number of matching stocks, starting with the number of active stocks in the Stock Universe, and applying each of the specified criteria in order from top to bottom. The final number reflects the number of stocks displayed in the Results Window.
Results Window
 Once a Screen has been successfully run, Results will be displayed in the Results Window, which is almost identical to that Watchlist’s Panel View. Each stock shows Ticker, Company Name, Power Gauge Rating, Last, and today’s Percent Change
Title Bar
The Results Title Bar shows the number of matching Results, a Power Bar indicating their Bullish/Neutral/Bearish breakdown, a Sort By drop-down, and a 'View in Workspace' button and 'Save Results' button.
![]()
Results Hotlink
Once you have successfully run a Screen which has generated matching results, select “View in Workspace” to quickly see these stocks in the Watchlist. This will create a working list called “Screening Results“. This list will be overwritten the next time you use this function unless you rename the list. You may use "Save Results" to create a new user list which will not overwritten or deleted by the system.

Sort By
By default, Results will be sorted alphabetically. As in the Watchlist, you can sort alphabetically, by Power Gauge Rating, or by today’s Percent Change, all either ascending or descending. When sorted by Percent Change, today’s advances will be colored GREEN, and declines will be colored RED.
Large Results Lists
The Chaikin Analytics Screener can generate Results lists of any size, though you may see less than optimal browser performance when displaying large lists. To account for this, if there are more than 500 matching Results, the application will display the first 500 alphabetically, and then prompt you whether you want to load remaining results. Press Continue to display all Results, or Cancel to see only the first 500.
Save Results & View in Watchlist
Enter a name for this list, and press Continue to save.
If you select “View in Watchlist”, the application will automatically switch to the Workspace, displaying this list in the Watchlist upon saving. This is a very convenient way to see the quality of this Screen.
Select Screener from the main navigation area again to switch back to the Screener. Your Screening Criteria and Results will be maintained, so you can try different Screening ideas in succession and see their impact on Results.
Save Your Screen
You have the option to save your screen definitions so you can retrieve them later for reuse. Screen definitions may also be deleted. To save time, you can duplicate an existing definition, modify it, then save it.
Saving a Screen
When you first enter the Screener, the screen is in its default state and is untitled.

Once you set some screening criteria and screen for stocks, the Save icon turns white indicating you may save your screen, should you decide you want to.
To do so, simply enter a name for your screen in the name field, shown as “click to name and save screen” to start, and press return.

If a screen of that name already exists, you will have the option to replace it or cancel.
Loading a Screen
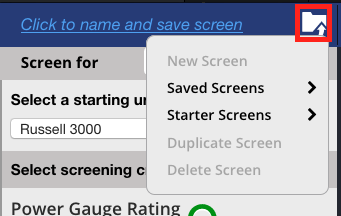
Your saved screens are shown under the Save Screen popup menu, which you access by clicking the menu arrow button next to the Save Screen folder. Then by clicking “Saved Screens” to see your list.

To load a screen, simply click on the one you want to load. After you do so, the screener will refresh with that screen’s name and criteria. You may then execute it, modify it, delete it, or reset it.
Starter Screens
Accessed the same way you access a Saved Screen. Instead click Starter Screens.
Deleting a Screen
To delete a screen, first you must load it, using the process above. Then select Delete Screen from the screener menu. You will have the option to continue or cancel.
Using One Screen as the Basis for Another
You can save time by using one screen as the basis for another. To do so, first create the base screen and save it. Then use the “Duplicate” command on the screener menu to make a copy of it.
The resulting screen will have the same name with a number attached at the end. Edit the name if you like, make any modifications you want to make in criteria. Then select “Save Screen” from the screener menu to save the changes you made.